Showing posts with label cake decorating. Show all posts

Sunday, October 26, 2014

Super Heroes' Cake

"An apple a day keeps doctor away, A hobby a life keeps Psychiatrist away"
First part is a known saying, second part is added by me. It has been a long time since I wrote a blog post. You see, if there are people who lack any hobby (example my husband), I am one of those who have too many hobbies. Juggling life with hobbies becomes challenging and it is more difficult if one hops from one hobby to another like I do.

Coming to the point of this post, even though I have been super busy with life, hobbies, I did find some time to decorate this cake for my friend's son's birthday. Nowadays, I tell people to get the plain cake from the bakery and I just do the decorating since it is not as time consuming. Birthday boy has a collection of super hero figurines and he wanted them on his cake. Since I have two girls, I know nothing about these super heroes but put together something that the kid suggested and my kids told some stories about. Birthday boy wanted iron man to fly and I faked it by building a rice crispy mountain and leaning iron man on top of a Popsicle stick.

Spider man looks like he is shooting the web. The stick is a spaghetti on which I piped some black icing. This was done when I was surrounded by 15 kids talking simultaneously at the party hall. It is one of the simplest cakes I have ever decorated but the birthday boy was happy. That's all it matters, right?

Enjoy.
Pin It

Monday, April 29, 2013

Princess Jasmine and Aladdin themed birthday cake

As you must know as a reader, I like cake decorating. It is a kind of stress reliever for me. So, I offer to make birthday cakes for my friends' kids' birthdays. You see, time is the most expensive deal here and everyone feels like they are bothering me even when I say that I want to do it. So, this year, when I was talking to my friend about her daughter's birthday party, suddenly an idea struck me. She was having a Jasmine princess themed party wherein a person would (from the kid's party place) come dressed as Jasmine. I told her to order the cake with icing but no decorations from any store of her choice and I told her to order Jasmine figurine from somewhere. She did and I got to have fun, let my creativity take a ride and not spend too much time so my friends' don't feel bad.
All I did was make a batch of icing, make the magic carpet and place the figurines with "Happy Birthday" written on it. When I finished making the magic carpet, the cake looked kind of empty towards the corners. So, I decided to pipe some flowers. Then I remembered I had some royal icing flowers from another project and I used them up to make it look a little more girly and pretty. So, if you are pressed for time, you could do this and make a personalized cake for your kid.


Note:
Pictures were taken in my kitchen without moving the cake from the counter. They are not that great.
This post is written for weekend cooking post that I write with Srivalli  and  Vaishali,  

Enjoy.
Pin It

Thursday, July 5, 2012

Easy Fondant Roses

Most of the things that are very famous and talked about are controversial. It applies to Fondant cakes too. People either love fondant or hate it. I am not talking about people who eat the cake, but people who work on decorating the cakes. Some people love buttercream so much that they do not even want to think about fondant. Some people vouch for fondant so much that they refuse to work with buttercream. If you need piping skills for buttercream, you need modelling skills for fondant. Whether one likes fondant or not, nobody can disagree that they can make cakes beautiful and so much real for a lot of projects. One of the main part of fondant decoration is the flowers on wedding cakes. You cannot place plastic flowers (yes, you could, but they don't look great, plus there is no personal thing about it) and not all fresh flowers are edible plus you cannot get all kinds of flowers at all the time. So, fondant and gumpaste flowers have their own market.
This post is about not how to make the real traditional fondant rose. I made those when I took cake decorating class and I know how time consuming they are. You make the base, let it dry, add one row of petals, let them dry and add the next and next and let the whole flower dry. Forget about the drying time, making them itself is an elaborate process.
Here is what Duff Goldman taught how to make roses in a jiffy. Remember, they don't look anywhere closer to what the real rose looks like, but they work and have a contemporary look if I may say so. These are cute and you can either top the center of a large cake with a bunch of them or just top each cupcake with one and put a leaf or two in between.
Step 1: Roll the fondant on a surface dusted lightly with corn starch.
Step 2: Cut three circles using a cookie cutter. You could use any sized cutter you wish. Same sized three circles is what you need.
Step 3: Place them overlapping as shown.
Step 4: Brush the center with some water as shown to act like glue.
Step 5: Roll them tight like a cylinder.
This is how it looks..
Step 6: Cut in the middle of the cylinder to get two pieces. And spread them a little bit with your hand or the ball tool. The fondant I have used was so dry that it cracked a little. If you use half fondant and half gumpaste, you can make thinner petals and they won't crack.
Few pictures of the rose made with a bigger cutter..
I have tried to thin the edges a bit.
Here is two sizes..
I know they don't look anywhere closer to what the traditional fondant rose is, but when you are pressed for time, you could make these.

This is my third day's entry to Blogging Marathon organized by Srivalli.

Have fun.
Pin It

Wednesday, July 4, 2012

Royal Icing

When I took the cake decorating classes 4 years back, second course was all about royal icing flowers along with few other butter cream decorations. I was surprised when the instructor said these are made to dry prior to placing on the cake. Very much similar to fondant, but completely dried fondant flowers are not good for eating, whereas these royal icing flowers are more like candies. Just sugar and water and egg white to hold them together. There are egg free versions, but I have not used them and cannot vouch for their effectiveness. Making royal icing is very easy if you have a powerful mixer. I prefer to use them for drop flowers when I am short of time. You could make them weeks ahead and stick them on the cake for a quickly decorated cake. Example is the cake I made this year. They make great cupcake toppers too.
Source: Wilton
Ingredients: 
Confectioner's sugar - 1 lb
Meringue powder - 3 TBSP (Egg white powder, not the whole dried egg powder)
Warm water - 5 - 6 TBSP depending on the consistency needed

Method:
Make sure all the bowls, beaters are completely grease free. Combine the meringue powder and confectioner's sugar and slowly add water and beat till it makes stiff peaks. It takes about 10 minutes using a heavy duty mixer and up to 15 minutes if using a hand held mixer.

Uses:
Make flowers, other cake decorative toppers. Icing cookies. Use stiff icing to give the outline and thin down the royal icing to flowing consistency to fill it.

Method to make drop flowers:
Make the royal icing. Tint with whatever color you want. Fill the bags and use the swirl tip. You can use 21 which gives you small flowers or 3D or 2C or 1M to get big ones. On a cookie sheet or a hard surface, place a sheet of wax paper. Keep the tip of the icing bag on the top of the wax paper. Squeeze and twist your wrist to about 40 - 50 degrees rotation. You will get the swirly petal. Add the center with a dot using a contrasting colored icing. Let them dry 24 - 48 hours. Humidity can make it not dry fast. So, make sure you are not rushing. Peel off and store in an air tight container.

Use of royal icing is just not for the flowers. When I made this cake, the bridge was made using royal icing. I piped the lines and stuck the wax paper to a cup to get the curve. It dried like that.
Egg free Royal Icing recipe (From Vegalicious):
 (I have not used it but have read it works fine)
1/2 c. confectioner's sugar
1 1/2 tsp. cornstarch
1 tsp. lemon juice
food coloring (optional)
2-3 tsp. soy milk

Beat all the ingredients except food coloring and use.
  This is my second day's entry to Blogging Marathon page of Srivalli.

Enjoy.
Pin It

Tuesday, July 3, 2012

Easy Cupcake decorating ideas

Today's post talks about easy cupcake decoration without using too many tools and without the need of high skills. Remember even for a small repair work, you still need at least a screw driver and sometimes a wrench. So, it does need couple of things but not a lot. Watch out for two more posts in a row about easy cake decoration tips.

What you will need..
Frosting of course. Refer to this post for various kinds of frostings.
Frosting consistency is medium same as used for borders and flower petals. Neither too thin, nor too thick.
Cupcakes - I had a bunch of kids to feed today, so I made them into mini cupcakes. Not ideal for showing decoration, but who needs bunch of kids with sugar rush around?
Piping bags - You can use any kind but I have done a light bag striping for one kind. You need parchment paper bag for that.
Tips - round tip, start tip, petal tip. You could just use a ziplock bag for round, and make zig zag out of the same for star, but you do need petal tip.
There are totally seven different kinds that I have done. I couldn't take better shots - had four kids staring at the table and waiting for me to say you can have the cupcake and fighting over who gets which one.
One:
This is a simple blob of icing piped as a big round and tapering towards the top like a hill. This is something anyone can do.

Two:
This is made with round tip but in a swirl fashion. You start at the outer edge of the cupcake and make a circle, but don't join and keep going as a spiral overlapping the outer circle. Finish at the center.

Three:
Same as two, but made with a start tip.

Four:
Instead of one big spiral, small spirals or rosettes as called in cake decorating lingo are piped to cover the entire cupcake. It is like writing '@' using a star tip and icing.

Five:
Zig zag lines are drawn on the top of the cupcake with star tip.

You can add sprinkles, colored sugar, mini chocolate chip to make it more colorful. All the above cupcakes are good for doing that. You could also top the cupcakes one through three with citrus zest, small sliced fruit or nuts, toasted coconut etc.

Six:
This is piped with petal tip. Start making the petals by turning your hand while squeezing the icing on the outer edge. Make a full circle. Start the inner circle and concentric circles fill the entire cupcake. Make one at the center.

Seven:
This is the cupcake that I have used bag striping technique. You paint one or two lines with gel color on the inner side of the bag and fill it with frosting. You get the tint only on the edge. I have used the same technique as the cupcake above - number six, but I have shaken my hand a little bit to get the zig zag effect of petals more.


Linking up to Blogging Marathon page of Srivalli.

Have fun and don't forget to visit tomorrow to read about Royal Icing flowers.


Pin It

Sunday, May 20, 2012

Pharmacy themed decorated cake

One of my friends was planning on giving a surprise birthday party to her husband. I and her take a walk sometimes. She started talking about it and asked what kind of cake should be made for his birthday. Boy, did she ask the question to the wrong person? I was there talking about the entire design of the cake during our remainder of the walk. She said she was amazed by the way I came up with the design, but I probably scared myself about how obsessed I am with these things. Anyway, coming to the point, her husband is into research in the field of medicine. There is a reason why I came up with the mortar and pestle design. They have a big curio full of different kinds of mortar and pestle collection. Keeping that in mind and the fact that he is into medicine, I made this cake.
Everyone loved it, I hope you enjoy it virtually too.
Everything is edible on the cake except for the mortar and pestle. That is foam cup cut to the height and filled a bit with fondant, covered with fondant and painted with silver color luster dust. Rx is food paint. Pestle is a bubble tea straw covered with fondant and shaped up.
Tablets are made out of fondant too.
Top view of the mortar and pestle.
Fondant scribbling paper with some calculations.
All in all, I had so much fun making this cake. The border is rosette at the bottom and reverse shell with wilton star tip 21 on the top.
Cake was vanilla sponge cake single layer with buttercream frosting.

Enjoy.
Pin It

Sunday, March 25, 2012

Birthday Cakes

I have been very busy. That is the reason for missing in action for more than a week here. Working 55 hours a week with all the other stuff I do, it is not an easy task to plan a birthday party that too when you are cooking everything at home including the cakes. Yes, cakes and not one cake since I combined two kids' birthday party together. You will see few new recipes that I made as part of the food sometime this week.
Here is how the conversation goes two weeks prior to the birthday party in my house. My older one is 'Vibha' and younger one is 'Lakshmi'. Here is how it went this time.

Me: Vibha, what cake do you want for your birthday.
Vibha: Vanilla cake, but I want a heart cake.
Me: Nobody has a heart cake for their birthday. It is for valentine's day or anniversary, engagement and stuff like that.
Vibha: But I love a heart cake with flowers on it.
(My husband who was silent all this time started talking. Let's call him 'S')
S: When she is asking for a heart cake, why don't you make it? Do you have a pan?
Me: Yes. But I have only one pan and I will have to bake it twice to make a layered cake.
S: Just make it one single layer cake then. If that is easier for you.

That is how this cake was made to make my kid happy. She wanted flowers on the cake and since I knew I would be very busy to pipe all buttercream flowers, I chose royal icing flowers which I made 2 days in advance.

Conversation with younger one:
Me: Lakshmi, what cake do you want for your birthday?
Lakshmi: Chocolate cake with chocolate frosting.
Me: What design.
Lakshmi: I don't know.

So, I decorated this in a very simple way with some dots and scrolls. I tried piping scrolls in another way in the beginning which, I didn't like. So, I had to remove them and redo it which has left some smudge marks on the cake. She actually wanted some sprinkles on the top, but since I have sent cupcakes for her birthday with sprinkles, I wanted something different.
Enjoy.
Pin It

Saturday, October 22, 2011

Spongebob Square Pant Cake

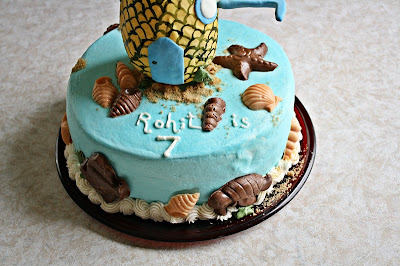
This post is not about a tutorial of how to make spongebob square pant cake. This post is about how to salvage when things don't go the way you have planned. I had offered to make a cake for my friend's son's birthday. Boy wanted a spongebob cake. I had planned to make different fondant elements in the beginning of the week so that it dries well. I did not know that I will be swamped at work the same week working about 12 - 14 hours a day on a new project. I still made the cake, everything went well, but not the way I had planned.
Firstly, it was an eggless cake. I have decorated many cakes, but none of them are eggless since most of them crumble when torted or carved. I could not use eggs this time. I chose this cake from allrecipes which uses condensed milk. I did make some changes taking the pointers from different reviewers but the cake came out dense and strong. I will probably stick to this recipe for all my eggless cakes that need to be decorated. I did not want to take the risk of torting and I used a homemade bake even strips. They rose without a hump in the middle and when I stacked them one on the other, it was fine without crumbling.
See the smudge mark? That happened just before taking pictures.
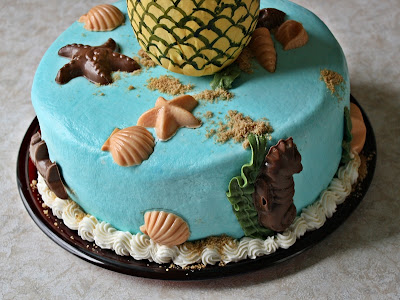
Then came the decorating part. I had plans of making rice crispy treat pineapple and then covering with fondant and decorating. I had again, no time. I went and got a styrofoam egg and covered that with fondant, painted. When it came to sticking the leaves, the fondant gum paste mixture leaves I had cut out the day before didn't dry. I had two options. Cut the leaves from real plant and stick it on the top or cut a foam sheet that was green in the shape. I chose the second option. But, the challenge was to make them stand up. I literally sewed them together and bundled them. Then I stuck them with a toothpick on the top of styrofoam pineapple.

To make my life easy, I used candy molds and made shells, star fish, turtle. All I had on hand were pink, white and chocolate candy melts. All in all, it was not a great job, but the kids loved it.
This cake is the best example for think outside the box. I kept a spongebob cake topper at the party, but I don't have the picture of that yet. I will update the post with that picture if I get it without any human being present in it.

Enjoy.
Pin It

Sunday, June 19, 2011

Baby Shower Cake

One of my friend is expecting her second child. Her husband planned on giving her a surprise baby shower. The moment I came to know about it, all I said was "I am making the cake unless you have some huge plan for it". He was kind enough to let me do whatever I want to do. But, I got busy this week. I had plans of making baby blocks using rice crispy treats covered with fondant, making a duck on one of the blocks, letters and all. I couldn't spend time on making these things that need to be made in advance. So, I took the easy way out and without spending too much time, made this cake. I was disappointed myself, but either my friends were very kind and said it was nice or they really liked it. I would never know.
I took the picture with the wrong setting without realizing and didn't have time to redo the picture. I am sharing whatever was the result of my hastiness.
Cake was vanilla cake, filled with buttercream and iced with buttercream tinted blue. Baby onesie is a fondant cutout. The dots, and circles are also fondant cutouts. I mixed the food color with lemon extract and painted the onesie.

Vanilla Cake recipe - adapted from here. I used buttermilk instead of milk.
Buttercream recipe - refer to this post.

Enjoy. Pin It

Thursday, April 28, 2011

Cake Pans and their Conversions

I have no sense of reasoning when it comes to buying cake pans. This started when I took all the wilton cake decorating courses. I paid full price and bought a lot of pans. Then I realized that I could get these for such a low price in thrift stores or sometimes garage sales that if I see a good deal, I buy it whether or not I need it. I have given it away to people whom I know or kept as spare pans when I do lot of baking during holiday season.
 Picture courtesy: Google Images

After having blogged for about a year and a half and having quite a few baking recipes, I get emails asking me what to do when they do not have the same sized pan as I used when I baked the cake as mentioned in the post. So, here are some links with the information of how to swap the cake pans. So many people have put together the list that there is no point in me typing the same old things.

Some pointers that I have learned from my baking experience:

1. You do not have to alter the baking temperature when you use a different sized or shaped pan. Most of the cakes are baked at 350 F with a few big cakes or pound cakes being baked at 325 F.

2. When you use a cake pan that is non-stick or a glass pan, always reduce the baking temperature by 25 F. You might have to bake for a little longer than what the recipe states, but check it at the lower range of the time that is specified in the recipe.

3. No matter what pan you are using, never fill the batter more than 1/2 way in the pan. Some cakes do fine when you fill it 2/3 full, but most cakes will not. Even when the batter might not overflow, it will make such a huge dome on the top that if you level it, you will waste lot of cake. Also, because of the huge hump, cake might not bake properly in the center causing not so good texture.

4. To calculate the volume of any pan, fill it with water and measure the water. You should use 1/2 of that amount as batter.

5. If the depth of the two cake pans is the same, you can compare the perimeter of them to decide if you can switch them. Example: a 9" square pan has a perimeter of 9 times 4 that is 36 ". It is the same as a 11 X 7 pan and hence you can swap a 9" square pan for a 11 X 7 pan.

Without reinventing the wheel, here are some great information about the cake pans, their conversions, baking temperature and baking times.
From all recipes - remember that most of these pans are 1 1/2" high and not 2".
From Joy of Baking - this has info both for 2" and 1 1/2" depth pans.
From ehow
From Baking 911 - Has info on cupcakes and jelly roll baking.
From about - has baking times for different cake pan sizes.
From Wilton - information on serving size, cake pan batter capacity, baking time and temperature.

Enjoy. Pin It

Sunday, April 17, 2011

Thomas the train Cake

I have offered pretty much every close friend of mine to make the cake for her/his kid's birthday. Some have taken the offer and some have refused it for their own reason. When they do take my offer, I have three questions for them. How many people does it need to feed, what should be the flavor of the cake and what is the theme?
They usually go with what their child likes the most. This time, I offered to make the cake for a friend's son's birthday. When I asked him what he wants, he said 'Car Cake'. I had made a car cake for him last year. You can see the details here.
When I told him that he had a car cake last year, why not choose another kind of cake, he said "But I like Cars." and left the room. His mother convinced him to go with 'Thomas the train cake' since he likes Thomas the train show.
So, when I decided on the design, I sort of combined both and let the boy have couple of trucks with a road on the cake too. A win win situation for all.
It is a two vanilla flavored 13 X 9 cakes put side by side, torted and filled with strawberry buttercream and frosted with buttercream. You can check out different frostings in this post.
Mountain is made out of rice crispy treat (homemade and vegan) and so are the ramps for the trucks. The Rail road crossing sign is foam sheet (I did not have the time to let fondant dry. Bad planning) and the white and red striped railroad gate (or bar whatever it is) is the lollipop stick painted with red color. Gravel on the railway track is Heathbar toffee bites and sand is brown sugar.
If anyone is interested in the details of how to make all the components of this cake, send me an email and I will try to explain it. All these pictures were taken in cloudy weather.
Have a great weekend. Pin It

Sunday, February 13, 2011

Sourdough Vanilla Cake (with decoration)

Sourdough Vanilla Cake
It was my kid's birthday this week. We are planning the party when the weather gets better. I did make her cup cakes to take to school, but she didn't actually 'cut the cake' on that day. When I was talking to some of my friends, I actually asked just a couple of families to come this weekend so that she can cut the cake and the others can sing her 'Happy Birthday' song. Since I had some bubbly sourdough to use up, I decided to make cake out of it. When I asked my daughter what she wanted, she said "Vanilla Cake". She turned six and she has seen me decorate cakes for the past 3 years. For her cake, she usually chooses the color, design and even when they don't work very well, I have to make it work. She wanted butterfly design cake and here is my take on it. I tried brush embroidery, but apparently I need lot of practice doing that.
One of the side views..
Sourdough Vanilla Cake

A collage of other side views..
Vibhacake_sides


Cake will be cut in the evening and I don't know if I will have any left to take a picture in the day light tomorrow. Look at the crumb in the picture where in I have shown torted cakes. Icing is buttercream icing. You can refer to my 'cake decorating' series for the recipe.
vibhacakep2

One year back - Khasta Kachori
Ingredients:
All purpose flour - 2 3/4 cups
Sourdough starter - 1 cup (fed)
Sourcream - 1 cup
Oil - 1/2 cup
Applesauce - 1/2 cup (You could increase oil to 1 cup if you don't want to use this)
Sugar - 1 1/2 cups
Egg - 2 Large
Salt - 1 tsp
Baking soda - 1 1/2 tsp
Vanilla - 1 TBSP

Cake decorating pictures.. (All the pictures below were taken under my yellow kitchen light. I work on decorating either early in the morning or in the night when kids are asleep)
vibhacake1

vibhacake2

Method:
Preheat the oven to 350 F. Grease and flour two 8" round cake pans or line with parchment paper. Set aside. In a bowl, whisk together sugar, baking soda, salt, flour. Set aside. In another bowl, combine oil, eggs, applesauce, sourcream. Whisk well. Slowly whisk in the sourdough starter. Stir Vanilla in. Add the dry mix to wet mix and stir until combined. Divide evenly between the pans and bake for 35 - 40 minutes or until a toothpick inserted in the center comes out clean. Cool in the pan on the rack for 10 minutes and then turn it on to the wire rack to cool completely.
vibhacake3

vibhacake4

vibhacake5

vibhacake7

vibhacake6

Go to town with decorating.
Notes:
Since I was baking this with the intention of decorating, I used bake even strips to prevent too much of doming. I got 2" height 2 layers.

Check out what other ladies are up to..
Srivalli, Azeema, Gayathri Kumar, Harini, Jay, Kamalika, Meena, Mina, Padma, PavaniPJPriya Suresh,Priya MahadevanRujuta, Santosh, Saraswathi, Savitha, Shanavi, Smitha, Sowmya, Suma, Usha, Veena.

Since this cake has sourdough in it, I am sending this to Susan's Yeastspotting.

Enjoy.
Pin It