Recipe is adapted from my bread machine manual.
Ingredients:
- Bread flour - 4 cups
- Sugar - 1/4 cup
- Vegetable oil - 1/4 cup (You could use butter to get a richer bread)
- Salt - 2 tsp
- Eggs - 2 large
- Water - Mixed with eggs to make 1 1/2 cups -- See instructions below.
- Active Dry yeast - 1 TBSP
Method:
I used the bread machine on dough cycle to make the dough, but I am giving you by hand method here.
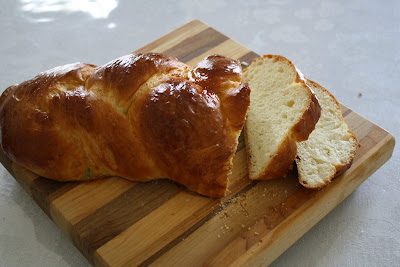
In a bowl, beat the eggs with 1 TBSP of water. Take out 3 TBSP of this mixture for the glaze. Top the rest with luke warm water to make it 1 1/2 cups. To this, add sugar, dry yeast. Let it sit for about 5 minutes or till frothy. Add to this salt, oil and flour little by little to make a smooth dough. Knead it well for at least 10 minutes. Cover and let rise till double in bulk or for about an hour. Divide the whole dough into 2 parts. Divide each half into 3 portions. On a lightly floured surface, roll each portion into a 10 " long roll. You'll have 6 10" long rolls. Place 3 rolls side by side on a parchment paper and pinch one side together. Using a lightly floured hands braid them and pinch them together at the end. Repeat with the rest 3 rolls. My first braid didn't come out all that great, but the second one was much better. Place the loaves with parchment paper on cookie sheet. Brush with egg wash and cover loosely with aluminum foil. I made a mistake and covered them with plastic wrap and it stuck at the end and the smoothness of the loaves was kind of lost. Let it rise for 45 minutes to an hour. Towards the end of rising time, preheat the oven to 400 F. Brush the loaves again with egg wash and bake for 10 minutes. Reduce the oven temperature to 350 F and bake for another 20 - 25 minutes or till nicely browned and the bottom sounds hollow when tapped. Mine was done at 20 minutes at 350 F. Cool on wire rack and slice when completely cool. I gave away the nicer looking loaf to my neighbor saying 'Thanks' and kept the other one for our house. I didn't eat it so I can't say how good it was but my kids loved it. I guess it is a good bread. But the crumb was awesome as you can see and for those who are hesitant to try this because of braiding, there is no reason why you can't bake this in a loaf pan. I have seen Ina Garten saying these make the best croutons for soups and the one she sliced was baked in a loaf pan. And I have heard people saying that these make the best french toast.
Another peek at the loaf isn't this gorgeous?
I am sending these loaves to Susan's 'Yeastspotting'.
Happy Baking!! Pin It


This bread looks very beautiful. Recently I saw in my friends blog too.
ReplyDeletewow this looks perfect :)
ReplyDeleteThats a nw kinda of bread to me!! Looks tempting!
ReplyDeleteWhata gorgeous looking bread! I wish to have a slice :)
ReplyDeleteWow, i like how golden the color is and how white it is inside. Simply beautiful :)
ReplyDeleteNice to know that you have such a nice and helpful neighbour .
ReplyDeleteNice challah bread,looks delicious.
Bread luks gr8!too soft...
ReplyDeleteloved to read the story abt ur neighbour..very good hearted though..the bread looks perfect...10/10 or i would say 100/100...
ReplyDeleteBread is sooooo good....love that nice sheen/golden color from outside & so white from inside....bookmarked....
ReplyDeleteBread looks gorgeous. Lucky neigbors.
ReplyDeleteBeautiful and worth trying bread..looks great..
ReplyDeleteIt is looking gorgeous...and the crust looks too gud..
ReplyDeleteBread looks gorgeous dear...
ReplyDeleteBeautiful bread!!
ReplyDeletehi champa, just wrote comment on your other post that I have to make a bread now & here I am thinking where is my bread pan,ha, didn't open few boxes since the last move so I guess i'm gonna stick more with artisan bread for now.....want your suggestion for egg replacement in this bread & also I'm out of bread flour so gonna use APF only. thanks in advance will be waiting for your suggetions.....
ReplyDeleteSpice,
ReplyDeleteFor the egg in the dough, either use yogurt or sour cream. It should work just fine. If you are alright using ricotta cheese, use part skim ricotta cheese in its place to get a nice crumb. For brushing, just mix 2 TBSP of milk with 2 TBSP of oil and brush them before baking. It probably will not give you this gorgeous color, but will be just fine. I do that for most of my bread since I don't consume eggs. Thanks for taking time to leave a comment and I look forward to seeing your bread pictures.
HI Champs, I did made the bread other day & it came out good but I used eggs....it did not rise that much but over all it was good bread. Thanks.
ReplyDeleteLooks fabulous Champa! Once the bread is braided, it needs to double again? Am not sure if I can gauge if it has doubled..
ReplyDeleteSuma,
ReplyDeleteYes. It needs to be doubled. After braiding, leave it covered for 30 minutes or so. When you gently press the dough, the indentation stays, the dough is ready to be baked. Hope this helps.